/*Here is where we come back after the Barcode Scanner is done*/
public void onActivityResult(int requestCode, int resultCode, Intent intent) {
if (requestCode == 0) {
if (resultCode == RESULT_OK) {掃
// Handle successful scan. In this example add contents to ArrayList
results.add(contents);
Intent intent = new Intent("com.google.zxing.client.android.SCAN");
intent.putExtra("SCAN_FORMATS", "PRODUCT_MODE,CODE_39,CODE_93,CODE_128,DATA_MATRIX,ITF");
startActivityForResult(intent, 0); // start the next scan
} else if (resultCode == RESULT_CANCELED) {
// User hass pressed 'back' instead of scanning. They are done.
saveToCSV(results);
//do whatever else you want.
}
}
}
2014年12月4日 星期四
2014年6月6日 星期五
Java中@Override的作用
Java中@Override的作用
@Override有注釋文檔的作用,可有可無有點像雞肋
但它對於編程粗心的人可是個很人性化的功能
如果想重寫父類的方法,比如toString()方法的話,在被重載的方法前面加上@Override ,這樣編譯的時候系統可以幫你檢查方法的正確性
如下
@Override
public String toString(){...}這是正確的
如果將toString寫成tostring
@Override
public String tostring(){...}編譯器可以檢測出這種寫法是錯誤的,提醒你改正
而如果不加@Override
public String tostring(){...}這樣編譯器是不會報錯的,它會認為是你在類中加的新方法
所以編程時一定得細心點,不是所有錯誤系統都能找到的
2014年6月3日 星期二
JAVA連接MSSQL範例
先下載Microsoft SQL Server JDBC Driver 2.0
將下載的檔案解壓縮後裡面兩個jar檔放置到你的jre目錄下的ext目錄(前提是你的java可以正常執行)
EX: C:\Program Files\Java\jre6\lib\ext
依JDK的不同,有不同的路徑,但是都差不多,請找一下你的java設定的classpath在哪
程式碼CODE如下:
//mssql範列展現了如何連結資料庫,提取資料的方法,可以參考
將下載的檔案解壓縮後裡面兩個jar檔放置到你的jre目錄下的ext目錄(前提是你的java可以正常執行)
EX: C:\Program Files\Java\jre6\lib\ext
依JDK的不同,有不同的路徑,但是都差不多,請找一下你的java設定的classpath在哪
程式碼CODE如下:
//mssql範列展現了如何連結資料庫,提取資料的方法,可以參考
import java.sql.*;
class mssql {
public <span class="pcg2ue8n98" id="pcg2ue8n98_7">static</span> void main(String[] args) {
//設定jdbc連結字串,請依你的SQL Server設定值修改
String conUrl = "jdbc:sqlserver://localhost:1433;databaseName=testdb;user=sa;password=sa;"; //for jdbc 2.0
Connection con = null;
try {
//註冊JODBC類
Class.forName("com.microsoft.sqlserver.jdbc.SQLServerDriver");
con = DriverManager.getConnection(conUrl);
//SQL語句
String SQL = "SELECT Top 10 * FROM movie_data";
Statement stmt = con.createStatement();
ResultSet rs = stmt.executeQuery(SQL);
//循環搜尋結果,請依你的資料庫來作提取資料欄位,以將下面的資料欄位對映你的資料欄位
while (rs.next()) {
<span class="pcg2ue8n98" id="pcg2ue8n98_4">System</span>.out.println(rs.getString("name") + ", " + rs.getString("Source"));
}
rs.close();
stmt.close();
}
catch (Exception ex) {
ex.printStackTrace();
}
}
}
JAVA變數範例 variable sample
class VarDemo
{
public static void main(String[] args)
{
int math=80, chn=90; //同時宣告二個變數,並指定值
int total, average; //宣告兩個變數
total = math + chn; //計算總分
average = total / 2; //計算平均
//將計算的結果顯示在螢幕上
System.out.println(“總分是:”+ total + “平均是:” + average);
}
}
2014年5月24日 星期六
JAVA運算子
算術運算子
Java 的算術運算子 (arithmetic operator) 包含加、減、乘、除、取餘數,皆需兩個運算元構成運算式,如下列表
| 運算子 | 功能 | 範例 |
|---|---|---|
| + | 加 | a + b |
| - | 減 | a - b |
| * | 乘 | a * b |
| / | 除 | a / b |
| % | 取餘數 | a % b |
相等性及關係運算子
Java 的相等性及關係運算子 (equality and Relational Operator) ,比較兩個運算元是否相等或大於小於,結果為布林字面常數 (Boolean literal) ,也就是true 或 false ,如下列表
| 運算子 | 功能 | 範例 |
|---|---|---|
| == | 相等 | a == b |
| != | 不相等 | a != b |
| > | 大於 | a >= b |
| >= | 大於等於 | a >= b |
| < | 小於 | a < b |
| <= | 小於等於 | a <= b |
條件運算子
Java 的條件運算子 (conditional operator) ,測試兩個運算元是否都為 true ,或有一個為 true ,另有一個三元運算子,若第一個運算元為 true ,運算結果就是第二個運算元,反之結果為第三個運算元,如下列表
| 運算子 | 功能 | 範例 |
|---|---|---|
| && | 邏輯且 | a && b |
| || | 邏輯或 | a || b |
| ?: | 條件選擇 | a ? b : c |
2013年10月9日 星期三
android TextView常用屬性
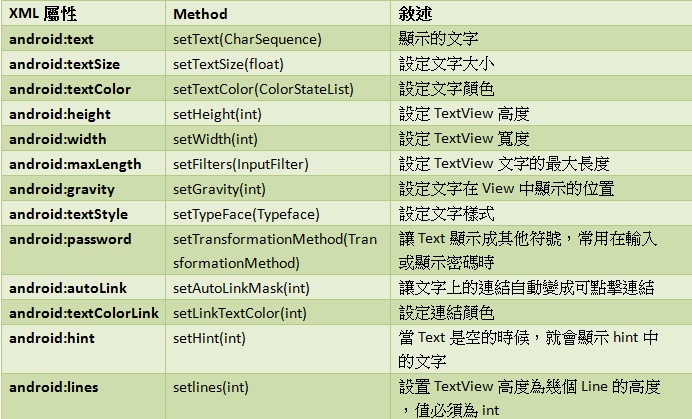
在程式開發裡,文字的顯示以及輸入為重要得一環,TextView是一個基本元件,不僅可以用main.xml檔來控制,也可以在java檔內用method來控制。
TextView常用屬性及對應method表:
小試身手小範例:
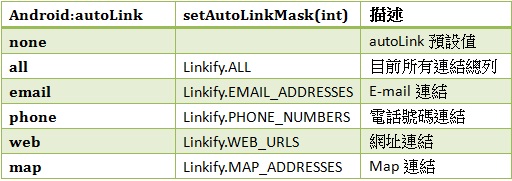
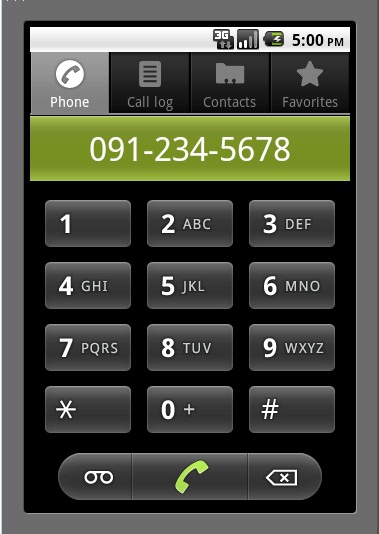
此範例會運用到三個<TextView>元件,其中兩個<TextView>元件做為網頁連結的書籤,內容為Google(“www.google.com”)以及Apple(“www.apple.com”)兩筆資料,最後一個為可撥話的手機號碼。當TextView加入autoLink屬性後,若文字當中有連結(ex. E-mail 、Map連結、電話號碼、網頁),即可自動連結並對應到適合的應用程式。
autoLink屬性表:
main.xml
<?xml version="1.0" encoding="utf-8"?>
<LinearLayout xmlns:android="http://schemas.android.com/apk/res/android"
android:orientation="vertical"
android:layout_width="fill_parent"
android:layout_height="fill_parent"
>
<TextView
android:layout_width="fill_parent"
android:layout_height="wrap_content"
android:text="google - www.google.com"
android:autoLink="web"
android:textSize="20sp"
/>
<TextView
android:layout_width="fill_parent"
android:layout_height="wrap_content"
android:text="apple - www.apple.com"
android:autoLink="web"
android:textSize="20sp"
/>
<TextView
android:layout_width="fill_parent"
android:layout_height="wrap_content"
android:text="Tom - 0912345678"
android:autoLink="phone"
android:textSize="20sp"
/>
</LinearLayout>
p.s由於使用web需要在AndroidManifest.xml中加入INTENT權限,不然會出現錯誤畫面喔!
(記得加上黃標那行)
<?xml version="1.0" encoding="utf-8"?>
<manifest xmlns:android="http://schemas.android.com/apk/res/android"
package="com.sam.test"
android:versionCode="1"
android:versionName="1.0">
<uses-sdk android:minSdkVersion="8" />
<application android:icon="@drawable/icon" android:label="@string/app_name">
<activity android:name=".LinearLayout01"
android:label="@string/app_name">
<intent-filter>
<action android:name="android.intent.action.MAIN" />
<category android:name="android.intent.category.LAUNCHER" />
</intent-filter>
</activity>
<uses-permission android:name="android.permission.INTENT"/>
</application>
</manifest>
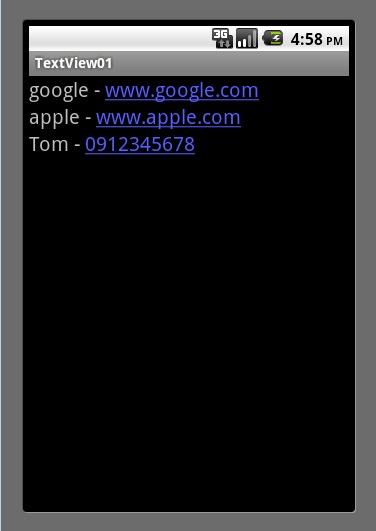
按下apple後
按下Tom的電話之後
android EditText屬性
    android:inputType="phone"  //電話號碼
    //文本類型,多为大寫、小寫和數字符號。
    android:inputType="none"
    android:inputType="text"
    android:inputType="textCapCharacters" //字母大寫
    android:inputType="textCapWords" //首字母大寫
    android:inputType="textCapSentences" //僅第一個字母大寫
    android:inputType="textAutoCorrect" //自動完成
    android:inputType="textAutoComplete" //自動完成
    android:inputType="textMultiLine" //多行輸入
    android:inputType="textImeMultiLine" //輸入法多行(如果支持)
    android:inputType="textNoSuggestions" //不提示
    android:inputType="textUri" //網址
    android:inputType="textEmailAddress" //電子郵件地址
    android:inputType="textEmailSubject" //郵件主題
    android:inputType="textShortMessage" //短訊
    android:inputType="textLongMessage" //長信息
    android:inputType="textPersonName" //人名
    android:inputType="textPostalAddress" //地址
    android:inputType="textPassword" //密碼
    android:inputType="textVisiblePassword" //可見密碼
    android:inputType="textWebEditText" //作为網頁表單的文本
    android:inputType="textFilter" //文本篩選過滤
    android:inputType="textPhonetic" //拼音輸入
    //數值類型
    android:inputType="number" //數字
    android:inputType="numberSigned" //帶符號數字格式
    android:inputType="numberDecimal" //帶小數點的浮點格式
    android:inputType="datetime" //時間日期
    android:inputType="date" //日期鍵盤
    android:inputType="time" //時間鍵盤
2013年10月6日 星期日
TableLayout與TableRow
http://android.yaohuiji.com/archives/tag/tablerow
表格布局 TableLayout
表格布局TableLayout以行列的形式管理子元素,每一行是一个TableRow布局对象,当然也可以是普通的View对象,TableRow离每放一个元素就是一列,总列数由列数最多的那一行决定。
我们看一个例子:
<?xml version=”1.0″ encoding=”utf-8″?>
<TableLayout android:id=”@+id/TableLayout01″
android:layout_width=”fill_parent” android:layout_height=”fill_parent”
android:stretchColumns=”0″ xmlns:android=”http://schemas.android.com/apk/res/android”>
<TableLayout android:id=”@+id/TableLayout01″
android:layout_width=”fill_parent” android:layout_height=”fill_parent”
android:stretchColumns=”0″ xmlns:android=”http://schemas.android.com/apk/res/android”>
<TableRow android:layout_width=”fill_parent”
android:layout_height=”20dip”>
<TextView android:text=”色彩透明度测试” android:textSize=”18dip”
android:layout_span=”2″ 合并两列
android:layout_gravity=”center”
android:layout_width=”fill_parent” android:layout_height=”fill_parent”>
</TextView>
</TableRow>
<TableRow android:layout_width=”fill_parent”
android:layout_height=”20dip”>
<TextView android:background=”#ff00ff00″
android:layout_width=”fill_parent” android:layout_height=”fill_parent”>
</TextView>
<TextView android:text=”#ff00ff00″ android:background=”#000″
android:textSize=”20dip” android:textColor=”#fff”
android:layout_width=”fill_parent” android:layout_height=”fill_parent”>
</TextView>
</TableRow>
<TableRow android:layout_width=”fill_parent”
android:layout_height=”20dip”>
<TextView android:background=”#ee00ff00″
android:layout_width=”fill_parent” android:layout_height=”fill_parent”>
</TextView>
<TextView android:text=”#ee00ff00″ android:background=”#000″
android:textSize=”20dip” android:textColor=”#fff”
android:layout_width=”fill_parent” android:layout_height=”fill_parent”>
</TextView>
</TableRow>
<TableRow android:layout_width=”fill_parent”
android:layout_height=”20dip”>
<TextView android:background=”#dd00ff00″
android:layout_width=”fill_parent” android:layout_height=”fill_parent”>
</TextView>
<TextView android:text=”#dd00ff00″ android:background=”#000″
android:textSize=”20dip” android:textColor=”#fff”
android:layout_width=”fill_parent” android:layout_height=”fill_parent”>
</TextView>
</TableRow>
<TableRow android:layout_width=”fill_parent”
android:layout_height=”20dip”>
<TextView android:background=”#cc00ff00″
android:layout_width=”fill_parent” android:layout_height=”fill_parent”>
</TextView>
<TextView android:text=”#cc00ff00″ android:background=”#000″
android:textSize=”20dip” android:textColor=”#fff”
android:layout_width=”fill_parent” android:layout_height=”fill_parent”>
</TextView>
</TableRow>
<TableRow android:layout_width=”fill_parent”
android:layout_height=”20dip”>
<TextView android:background=”#bb00ff00″
android:layout_width=”fill_parent” android:layout_height=”fill_parent”>
</TextView>
<TextView android:text=”#bb00ff00″ android:background=”#000″
android:textSize=”20dip” android:textColor=”#fff”
android:layout_width=”fill_parent” android:layout_height=”fill_parent”>
</TextView>
</TableRow>
<TableRow android:layout_width=”fill_parent”
android:layout_height=”20dip”>
<TextView android:background=”#aa00ff00″
android:layout_width=”fill_parent” android:layout_height=”fill_parent”>
</TextView>
<TextView android:text=”#aa00ff00″ android:background=”#000″
android:textSize=”20dip” android:textColor=”#fff”
android:layout_width=”fill_parent” android:layout_height=”fill_parent”>
</TextView>
</TableRow>
<TableRow android:layout_width=”fill_parent”
android:layout_height=”20dip”>
<TextView android:background=”#9900ff00″
android:layout_width=”fill_parent” android:layout_height=”fill_parent”>
</TextView>
<TextView android:text=”#9900ff00″ android:background=”#000″
android:textSize=”20dip” android:textColor=”#fff”
android:layout_width=”fill_parent” android:layout_height=”fill_parent”>
</TextView>
</TableRow>
<TableRow android:layout_width=”fill_parent”
android:layout_height=”20dip”>
<TextView android:background=”#8800ff00″
android:layout_width=”fill_parent” android:layout_height=”fill_parent”>
</TextView>
<TextView android:text=”#8800ff00″ android:background=”#000″
android:textSize=”20dip” android:textColor=”#fff”
android:layout_width=”fill_parent” android:layout_height=”fill_parent”>
</TextView>
</TableRow>
<TableRow android:layout_width=”fill_parent”
android:layout_height=”20dip”>
<TextView android:background=”#7700ff00″
android:layout_width=”fill_parent” android:layout_height=”fill_parent”>
</TextView>
<TextView android:text=”#7700ff00″ android:background=”#000″
android:textSize=”20dip” android:textColor=”#fff”
android:layout_width=”fill_parent” android:layout_height=”fill_parent”>
</TextView>
</TableRow>
<TableRow android:layout_width=”fill_parent”
android:layout_height=”20dip”>
<TextView android:background=”#6600ff00″
android:layout_width=”fill_parent” android:layout_height=”fill_parent”>
</TextView>
<TextView android:text=”#6600ff00″ android:background=”#000″
android:textSize=”20dip” android:textColor=”#fff”
android:layout_width=”fill_parent” android:layout_height=”fill_parent”>
</TextView>
</TableRow>
<TableRow android:layout_width=”fill_parent”
android:layout_height=”20dip”>
<TextView android:background=”#5500ff00″
android:layout_width=”fill_parent” android:layout_height=”fill_parent”>
</TextView>
<TextView android:text=”#5500ff00″ android:background=”#000″
android:textSize=”20dip” android:textColor=”#fff”
android:layout_width=”fill_parent” android:layout_height=”fill_parent”>
</TextView>
</TableRow>
<TableRow android:layout_width=”fill_parent”
android:layout_height=”20dip”>
<TextView android:background=”#4400ff00″
android:layout_width=”fill_parent” android:layout_height=”fill_parent”>
</TextView>
<TextView android:text=”#4400ff00″ android:background=”#000″
android:textSize=”20dip” android:textColor=”#fff”
android:layout_width=”fill_parent” android:layout_height=”fill_parent”>
</TextView>
</TableRow>
<TableRow android:layout_width=”fill_parent”
android:layout_height=”20dip”>
<TextView android:background=”#3300ff00″
android:layout_width=”fill_parent” android:layout_height=”fill_parent”>
</TextView>
<TextView android:text=”#3300ff00″ android:background=”#000″
android:textSize=”20dip” android:textColor=”#fff”
android:layout_width=”fill_parent” android:layout_height=”fill_parent”>
</TextView>
</TableRow>
<TableRow android:layout_width=”fill_parent”
android:layout_height=”20dip”>
<TextView android:background=”#2200ff00″
android:layout_width=”fill_parent” android:layout_height=”fill_parent”>
</TextView>
<TextView android:text=”#2200ff00″ android:background=”#000″
android:textSize=”20dip” android:textColor=”#fff”
android:layout_width=”fill_parent” android:layout_height=”fill_parent”>
</TextView>
</TableRow>
<TableRow android:layout_width=”fill_parent”
android:layout_height=”20dip”>
<TextView android:background=”#1100ff00″
android:layout_width=”fill_parent” android:layout_height=”fill_parent”>
</TextView>
<TextView android:text=”#1100ff00″ android:background=”#000″
android:textSize=”20dip” android:textColor=”#fff”
android:layout_width=”fill_parent” android:layout_height=”fill_parent”>
</TextView>
</TableRow>
<TableRow android:layout_width=”fill_parent”
android:layout_height=”20dip”>
<TextView android:background=”#0000ff00″
android:layout_width=”fill_parent” android:layout_height=”fill_parent”>
</TextView>
<TextView android:text=”#0000ff00″ android:background=”#000″
android:textSize=”20dip” android:textColor=”#fff”
android:layout_width=”fill_parent” android:layout_height=”fill_parent”>
</TextView>
</TableRow>
<TextView android:text=”色彩透明度测试” android:textSize=”18dip”
android:gravity=”center_horizontal” android:layout_width=”fill_parent”
android:layout_height=”wrap_content”>
</TextView> 可以看到这个TextView可以作为TableLayout的一行</TableLayout>
android:gravity=”center_horizontal” android:layout_width=”fill_parent”
android:layout_height=”wrap_content”>
</TextView> 可以看到这个TextView可以作为TableLayout的一行</TableLayout>
再看一下显示效果:
其中 android:stretchColumns=”0″ 作用是让第一列可以扩展到所有可用空间;下面我们讲一下TableLayout几个重要的属性:
collapseColumns – 设置隐藏那些列,列ID从0开始,多个列的话用”,”分隔
stretchColumns – 设置自动伸展那些列,列ID从0开始,多个列的话用”,”分隔
shrinkColumns -设置自动收缩那些列,列ID从0开始,多个列的话用”,”分隔
stretchColumns – 设置自动伸展那些列,列ID从0开始,多个列的话用”,”分隔
shrinkColumns -设置自动收缩那些列,列ID从0开始,多个列的话用”,”分隔
可以用”*”来表示所有列,同一列可以同时设置为shrinkable和stretchable。
我们再举一个例子来看一下:
<?xml version=”1.0″ encoding=”utf-8″?>
<TableLayout xmlns:android=”http://schemas.android.com/apk/res/android”
android:layout_width=”fill_parent”
android:layout_height=”fill_parent”
android:stretchColumns=”1″> 第二列自动伸展
<TableLayout xmlns:android=”http://schemas.android.com/apk/res/android”
android:layout_width=”fill_parent”
android:layout_height=”fill_parent”
android:stretchColumns=”1″> 第二列自动伸展
<TableRow>
<TextView
android:layout_column=”1″ 我是第二列android:text=”打开…”
android:padding=”3dip” /> 元素内容与边界之间保留3dip的距离<TextView
android:text=”Ctrl-O”
android:gravity=”right”
android:padding=”3dip” />
</TableRow>
<TextView
android:layout_column=”1″ 我是第二列android:text=”打开…”
android:padding=”3dip” /> 元素内容与边界之间保留3dip的距离<TextView
android:text=”Ctrl-O”
android:gravity=”right”
android:padding=”3dip” />
</TableRow>
<TableRow>
<TextView
android:layout_column=”1″
android:text=”保存…”
android:padding=”3dip” />
<TextView
android:text=”Ctrl-S”
android:gravity=”right” 元素本身的内容向右对齐android:padding=”3dip” />
</TableRow>
<TextView
android:layout_column=”1″
android:text=”保存…”
android:padding=”3dip” />
<TextView
android:text=”Ctrl-S”
android:gravity=”right” 元素本身的内容向右对齐android:padding=”3dip” />
</TableRow>
<TableRow>
<TextView
android:layout_column=”1″
android:text=”另存为…”
android:padding=”3dip” />
<TextView
android:text=”Ctrl-Shift-S”
android:gravity=”right”
android:padding=”3dip” />
</TableRow>
<TextView
android:layout_column=”1″
android:text=”另存为…”
android:padding=”3dip” />
<TextView
android:text=”Ctrl-Shift-S”
android:gravity=”right”
android:padding=”3dip” />
</TableRow>
<View
android:layout_height=”2dip”
android:background=”#FF909090″ />
android:layout_height=”2dip”
android:background=”#FF909090″ />
<TableRow>
<TextView
android:text=”X”
android:padding=”3dip” />
<TextView
android:text=”导入…”
android:padding=”3dip” />
</TableRow>
<TextView
android:text=”X”
android:padding=”3dip” />
<TextView
android:text=”导入…”
android:padding=”3dip” />
</TableRow>
<TableRow>
<TextView
android:text=”X”
android:padding=”3dip” />
<TextView
android:text=”导出…”
android:padding=”3dip” />
<TextView
android:text=”Ctrl-E”
android:gravity=”right”
android:padding=”3dip” />
</TableRow>
<TextView
android:text=”X”
android:padding=”3dip” />
<TextView
android:text=”导出…”
android:padding=”3dip” />
<TextView
android:text=”Ctrl-E”
android:gravity=”right”
android:padding=”3dip” />
</TableRow>
<View
android:layout_height=”2dip”
android:background=”#FF909090″ />
android:layout_height=”2dip”
android:background=”#FF909090″ />
<TableRow>
<TextView
android:layout_column=”1″
android:text=”退出”
android:padding=”3dip” />
</TableRow>
</TableLayout>
<TextView
android:layout_column=”1″
android:text=”退出”
android:padding=”3dip” />
</TableRow>
</TableLayout>
下面是显示效果:
我加粗显示的地方都有解释,大家可以留意一下。
Tip:TableRow也是一个Layout,里面的元素会水平排列,如果TableRow的父元素不是TableLayout的话,那么他会表现的像一个LinearLayout。
TableLayout介紹
这篇博文包括的内容:
1、TableLayout简介
2、TableLayout行列数的确定
3、TableLayout可设置的属性详解
4、一个包含4个TableLayout布局的实例及效果图
一、Tablelayout简介
二、TableLayout行列数的确定
三、TableLayout可设置的属性详解
TableLayout可设置的属性包括全局属性及单元格属性。1、全局属性也即列属性,有以下3个参数:
android:stretchColumns设置可伸展的列。该列可以向行方向伸展,最多可占据一整行。
android:shrinkColumns设置可收缩的列。当该列子控件的内容太多,已经挤满所在行,那么该子控件的内容将往列方向显示。
android:collapseColumns 设置要隐藏的列。
示例:
android:stretchColumns="0"第0列可伸展
android:shrinkColumns="1,2"第1,2列皆可收缩
android:collapseColumns="*"隐藏所有行 说明:列可以同时具备stretchColumns及shrinkColumns属性,若此,那么当该列的内容N多时,将“多行”显示其内容。(这里不是真正的多行,而是系统根据需要自动调节该行的layout_height)
2、单元格属性,有以下2个参数:
android:layout_column指定该单元格在第几列显示 android:layout_span指定该单元格占据的列数(未指定时,为1)
示例:android:layout_column="1"该控件显示在第1列 android:layout_span="2"该控件占据2列 说明:一个控件也可以同时具备这两个特性。
四、一个包含4个TableLayout布局的实例及效果图
<?xml version="1.0" encoding="utf-8"?>
<LinearLayout xmlns:android="http://schemas.android.com/apk/res/android"
android:orientation="vertical"
android:layout_width="fill_parent"
android:layout_height="fill_parent"
android:padding="3dip"
>
<!-- 第1个TableLayout,用于描述表中的列属性。第0列可伸展,第1列可收缩,第2列被隐藏--> <TextView
android:text="表1:全局设置:列属性设置"
android:layout_height="wrap_content"
android:layout_width="wrap_content"
android:textSize="15sp"
android:background="#7f00ffff"/>
<TableLayout
android:id="@+id/table1"
android:layout_width="fill_parent"
android:layout_height="wrap_content"
android:stretchColumns="0"
android:shrinkColumns="1"
android:collapseColumns="2"
android:padding="3dip">
<TableRow>
<Button android:text="该列可伸展"/>
<Button android:text="该列可收缩"/>
<Button android:text="我被隐藏了"/>
</TableRow>
<TableRow>
<TextView android:text="我向行方向伸展,我可以很长 "/>
<TextView android:text="我向列方向收缩,我可以很深"/>
</TableRow>
</TableLayout>
<!-- 第2个TableLayout,用于描述表中单元格的属性,包括:android:layout_column 及android:layout_span--> <TextView
android:text="表2:单元格设置:指定单元格属性设置"
android:layout_height="wrap_content"
android:layout_width="wrap_content"
android:textSize="15sp"
android:background="#7f00ffff"/>
<TableLayout
android:id="@+id/table2"
android:layout_width="fill_parent"
android:layout_height="wrap_content"
android:padding="3dip">
<TableRow>
<Button android:text="第0列"/>
<Button android:text="第1列"/>
<Button android:text="第2列"/>
</TableRow>
<TableRow>
<TextView android:text="我被指定在第1列" android:layout_column="1"/>
</TableRow>
<TableRow>
<TextView
android:text="我跨1到2列,不信你看!"
android:layout_column="1"
android:layout_span="2"
/>
</TableRow>
</TableLayout>
<!-- 第3个TableLayout,使用可伸展特性布局--> <TextView
android:text="表3:应用一,非均匀布局"
android:layout_height="wrap_content"
android:layout_width="wrap_content"
android:textSize="15sp"
android:background="#7f00ffff"/>
<TableLayout
android:id="@+id/table3"
android:layout_width="fill_parent"
android:layout_height="wrap_content"
android:stretchColumns="*"
android:padding="3dip"
>
<TableRow>
<Button android:text="一" ></Button>
<Button android:text="两字"></Button>
<Button android:text="三个字" ></Button>
</TableRow>
</TableLayout>
<!-- 第4个TableLayout,使用可伸展特性,并指定每个控件宽度一致,如1dip--> <TextView
android:text="表4:应用二,均匀布局"
android:layout_height="wrap_content"
android:layout_width="wrap_content"
android:textSize="15sp"
android:background="#7f00ffff"/>
<TableLayout
android:id="@+id/table4"
android:layout_width="fill_parent"
android:layout_height="wrap_content"
android:stretchColumns="*"
android:padding="3dip"
>
<TableRow>
<Butto
訂閱:
文章 (Atom)

